
Follow along as Michael Finch, a Suspension Specialist at 4Wheel Drive Hardware, builds this Cheap Cherokee project with all the preventive maintenance required and a number of choice, but economical, upgrades. Once complete, his teenage daughter will be able to drive to school and dance practice in something reliable, inexpensive and safe — and Michael can teach her off-roading. If you missed it, check out the Introduction to this project.
Turning to Trail Master
Next up is the tired, saggy and rotten suspension. No rust, but bone stock with 280K miles. I chose the Trail Master 4.5-inch lift kit because, part-for-part, dollar-for-dollar, it’s hard to beat. The kit comes with full rear spring packs, new front coils, lower control arms, longer rear shackles, shocks and sway bar links all for a bargain price.
Since a new set of shocks costs almost $400, why not pay a little more for a full rear leaf pack with full lift coils instead of spacers and blocks? Some of the guys in the Jeep club gave me grief for not going with another brand like Rubicon, which has high-quality products and comes with all the bells and whistles you could want, but I don’t need all those extras just yet. I’ll upgrade the necessary extras as I need (and can afford) them.
Either kit gives enough room for up to 32” tires without trimming, which is big as you want to go on stock 3.55 gears, but at 33” you’ll have to fold the rear pinch seam and trim the front fenders. If the plan is daily driving, fire roads and some muddin’, this is the perfect kit. For big rocks and tight trails, you’ll want additional parts to really make it rock.
Installation
Taking Inventory
The first step of any new part install is to open the boxes and take inventory. Getting your rig torn down with halfway-installed new parts only to find something missing is a terrible experience — especially if it’s your daily driver.
After taking a thorough inventory, read the instructions to make sure you understand what you’re doing and how to do it. No instructions cover everything, so I’ll cover some of the tricks for making things easier which I’ve picked up over the years.
It’s helpful to have a buddy over so you have another set of hands and eyes for the install and, if needed, a ride to your local 4 Wheel Parts store.
Prep
Park the Jeep where you are have plenty of space to work, are protected from the elements and don’t need to worry about spills.
Pro tip: in the week before the install, I went out every night and sprayed all the nuts and bolts with PB Blaster penetrating lubricant to help loosen everything. When bolts and nuts been on the rig, untouched for almost 20 years, they’re gonna need some persuasion.
Before I get the Jeep up in the air, I like to loosen all the lug nuts and control arm bolts. This makes it safer to pull on them once it’s up on jack stands. Keep in mind that once you get it on jack stands, your Jeep is going to be much taller, so you might want to invest in a set quality tall jack stands that go up to 18” high.
Tear-Down
Place blocks in front of and behind the rear tires. Next, put your jack just to the passenger side of the front diff. You can lift from the bottom of the diff for a few more inches up, but it will lift unevenly.
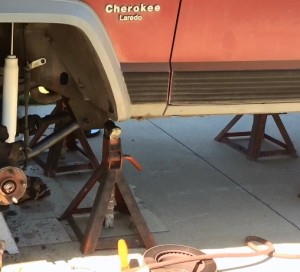 Once the jack is maxed out, place jack stands behind the front control arm boxes and extend them as high as they’ll go. Now remove the front tires. Once that’s done, lower the floor jack — but not so far that there’s a space between the jack lift plate and the axle. Don’t take it out from under the front axle, or you risk the axle dropping or to stripping a bolt as you’re taking off the front suspension parts. Pre-load the suspension up a little to ensure it isn’t bottomed out.
I start on the passenger side and take the parts off in this order:
- Caliper bolts, then pull the caliper off/set it aside without letting it dangle from the brake line. Zip ties or a long piece of wire are good here to attach the calipers to something out of the way without pulling on the brake line.
- Lower shock mount bolts
- Upper shock nut
- Lower track bar bolt
- Coil spring retainer clip and spring
- Sway bar end links
Tie rod end on the steering knuckle (Pro tip: To avoid destroying the threaded tie rod end or the boot, loosen the nut after you take out the cotter pin and leave the nut covering the threads. Then, smack the outside edge of the knuckle where the drag link attaches. This will cause the knuckle to flex around the tapered drag link end, popping it out.)
Repeat the process on the driver’s side. I leave the control arms on to keep the axle from squirming around while still allowing it to droop enough for seating the new springs.
Addressing Bump Stops and Replacing Control Arms
 Next is the axle. I start by addressing the bump stop issue, which is best to do with the spring out. The lower bump pad needs to be raised to keep the tire out of the fender. This will limit up-travel, but keeps you from grooving your tires. A set of Rubicon Express R/ERE1380 2” bump stops are a good, affordable choice that come with self-tapping center bolts and are sold as a pair. Simply follow the instructions on the install for the bump stops, it’s straightforward. Use some blue threadlock on the bolts to keep them in place.
Next up, the rotten upper control arm bushings. The Currie Flex Joint CURCE-9102K is a great solution to the limited flex of standard rubber or stiffness of poly, so you can run your stock arms and have them flex with Johnny Joints. We will also swap the rotten stock bump stops for extended Rubicon Express units while the spring is out.
Next, I replaced the lower control arm on the passenger side. When breaking free the lower control arm nut, continue running the bolt out and it will use the bolt threads to push itself out. When you can’t run it any farther, use a small Phillips screwdriver to finish the removal.
You might need a small pry bar or screwdriver to line up the holes while putting the new arm in. Often, changing the height of the axle with the jack will help line up the holes. Don’t fight it, try raising it and if that makes the hole go the wrong way, lower it. A ratchet strap to the front bumper to get some forward pull can help too. The bolt is pointed on the end, but if it’s out of alignment you can really mess up the threads by beating it through. Don’t fully torque any of the bolts until you lower the Jeep back on the springs under its own weight.
For the coil spring installation, I don’t like using a spring compressor. They work and can make this part easier, but they’re also dangerous and a cheap one can be deadly. The other option is to have a friend step on the end of the hub and push down to give you the slack you need in the suspension to get the new spring over the centering hub. With the axle drooped all the way out, it won’t take much to get the spring into place.
Shock Treatment
Once the spring is in, put the shock in, then the brake line relocation bracket. Unbolt the T40 Torx bolt which holds the brake line to the “frame” – once it’s out you can straighten the line. Be gentle, this line can be pretty fragile.
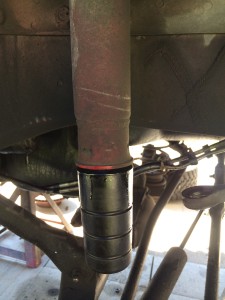
Bolt the long end of the bracket to the body then bolt the OEM bracket to the new extended bracket. You can now install the new sway bar extended links and adapters. These are non-disconnect, but much beefier than the originals. They also use two eye ends as opposed to an eye and a stem, like the OEMs have, so they will flex better. Install the bushings in the links using a little WD40 and a mallet.
The sleeve bushings that go into the ends are a different diameter. One will put up a fight and has a thicker wall; the other will slip in with a little lube. Put one of the thick ones in one end and a thin one in the other. If you put both thin or thick in the same link, it won’t bolt up to your rig.
After doing all this on both sides of the rig, lift it back up and put it on jack stands under the axle so its weight is on the suspension and finish tightening down all the suspension bolts. Double-check that you have properly torqued everything. Leave the track bar bolt out at this point.
You can put the tires on if you’re not going to add any more parts, such as a new adjustable track bar, stainless brake lines or sway bar disconnects.
Odds & Ends
A few last things to tie a bow on the front suspension install. First, the front track bar bolt that we left out earlier. Have a friend turn the steering wheel until the track bar end lines up with the bolt hole on the axle, then hold the nut keeper tab and use your fingers to start the bolt. Be careful as this is an easy bolt to cross-thread. I’ve found using the directions “turn to driver” or “turn to passenger” works well — it eliminates the “my left or your left?” issue.
The Trail Master kit instructions don’t say anything about your track bar now being out of alignment after the lift due to the increased angle it has. You can fix some of this by re-drilling your axle-end track bar bolt hole ¾ of an inch to the driver’s side. To me, this is a temporary fix. I’d recommend the first upgrade you make to the kit is a Rubicon Express RE1600 adjustable track bar.
With the track bar hooked up and bolt torqued to spec, you can align your tires (this can also be done after the rear install is completed). You should take it to a shop for the best possible results, but you can do a “good enough” job in your driveway.
On the front end, obviously, measure from a spot on the front side of the right tire to a matching spot on the front of the left tire. Make sure you measure in the same spot on each tire. I recommend using a piece of chalk to make sure you get the same place as you check your measurements.
Now measure to those same spots on the back side of the tires, making sure your tape measure isn’t bending on/around anything under the Jeep. You’ll find you have about one inch of toe-in. In other words, the front edges of the tire are closer together than the rear. If you drive like this, you’ll burn up your tires and the Jeep will handle poorly. You want tp set the front measurement at 1/4” less than the rear (or 1/4” toe-in) to preload the steering parts to keep them tight by making the tie rod longer. Lengthen the tie rod by loosening the bolts in the clamp rings on the tie rod and rotating. It might take a couple of tries to make sure you’re going in the right direction and measure as you go to minimize the effort required.
Now you can fix your steering wheel alignment, because it won’t be oriented correctly after the lift. Jack the front tires just barely off the ground and reach in to put the key in the ignition and turn it to the accessory position to unlock the steering wheel. Then turn the wheel however needed to point the tires straight. Drop the jack and loosen the bolts in the clamp rings on your drag link adjuster. You can turn the adjuster until the wheel is in the correct orientation. Both the toe-in and steering wheel alignment may need fine-tuning after you test drive the Jeep.
 Next time we’ll tackle getting the rear end of the Jeep lifted to match.
Be sure to check out 4WD for all your XJ Jeep parts needs.