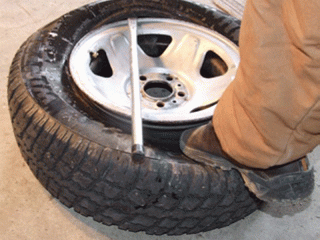
Removing the front of the tire over the front of the rim – Take the Deluxe Tire Iron and slip it between the tire and rim. Hook the bead of the tire with the lip of the spoon, and using the rim as a leverage point, pull the tire up and over the top of the rim.
Insert the Standard Tire Iron next to the Deluxe Tire Iron to keep the tire pulled up over the rim, and then remove the Deluxe Tire
Iron. The Standard Tire Iron will remain in this position until the front of the tire is off the rim.
Lubricate an area of the tire and rim about 6-8 inches to one side of where the tire is riding on the lip of the rim. Repeat the process of slipping the Deluxe Tire Iron between the tire and rim, hooking the tire. Lever the next portion of the tire up and over the rim.
Leaving the Deluxe Tire Iron hooked on the tire, hit the iron with a mallet to try to work the iron along the tire/rim interface, getting more tire to slip out and over the rim. Use lots of lubrication for this, either soapy water or Windex.
When the mallet won’t work, go back to slipping the Deluxe Tire Iron in between the tire and rim. Keep the opposite side of the tire
tucked into the well of the rim so you have more tire to work with.
Work about 6-8 inches to the side of where the tire is riding on the lip of the rim, and lever it over the top.
Working in small increments is easiest.
The front of the tire should now be off the rim.
Removing the back of the tire over the front of the rim – Lubricate as much of the inside of the rim and the back bead area of the tire as you can. The more thoroughly you do this, the easier the next steps will be. Place the tire and rim face down, so that the back of the tire and rim are facing upward. Lift the rim upward so the front of the rim touches the inside of the back of the tire.
