• Home
  • About
  • Magazine Issues
  • Past Issues
  • Privacy
  • Contact

JPFreek Adventure Magazine

Jeep Adventure Lifestyle Magazine

  • Jeep Adventure
    • Around Africa in a Jeep
    • Team JPFreek Takes on the Rebelle Rally
  • Freek Garage
  • Jeep News
  • The Campfire
  • Magazine Issues
You are here :Home Freek Garage Removing & Fitting a Tire

Removing & Fitting a Tire

November 7, 2010 by JPFreek

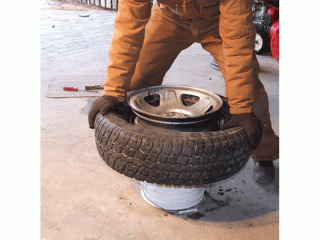
Pressing the rear of the tire onto the shoulder – Place the tire and rim face up on top of a five gallon bucket.

Push down on the tire using your hands and a knee. Work your way all the way around the tire until the edge of the tire is sitting on the shoulder.

13

NOTE: The tire does not have to be flush with the lip of the rim. It just has to be in contact with the rim.

Attach the air hose, put the tire back on the bucket, face down, and re-seat the bead as we did in the valve stem replacement clinic.

Watch this process by viewing the video below:

– Special thanks to Martyn Davies for his contribution of this article

Related – Driving Skills: Left Foot Braking

* Published by JPFreek Jeep Adventure Magazine – The leader in Jeep and adventure enthusiast publications.
Share on Facebook Share
Share on TwitterTweet
Share on Pinterest Share
Share on LinkedIn Share
Share on Digg Share
Send email Mail

Related stories:

  1. AEV JT350/370 Gladiator – Now Available
Pages: 1 2 3 4

Filed Under: Freek Garage Tagged With: Jeep, JPFreek, tire

« Magellan's GPS Toughcase for iPhone & iPod Touch
Winter Approach »
JPFreek Adventure Magazine

New on JPFreek:

  • ExtremeTerrain 2018 Jeep Wrangler JLU Build – New video
  • Silver Lake Sand Dunes – Michigan – cool photos
  • Warn Industries’ New HUB Receiver & App Lets Users Operate Their Winch With a Smart Phone

Return to top of page

Copyright © 2021 · JPFreek Adventure Publications, LLC