The Trailgater Tailgate Table is one of my favorite additions to my Jeep for camping. I use it for three meals a day, and sometimes even as a workbench. My cutlery and small tools have been floating around in Tupperware containers taking up the limited storage space I have in the Jeep. I wanted them to be very handy to the table, and I wanted to take advantage of the otherwise wasted storage space contained in the folded table.
This DIY article is based around the Trailgater Tailgate Table, though I see no reason it won’t work just the same on any other Tailgate Table, bought or home made.
I choose to mount a piece of thin masonite to the backplate of my Trailgater, then mounted everything to that. I could have drilled into the stainless backplate directly, but I liked the idea of this being a reversible modification. Also down the road I could make a different backboard with a different set of cutlery and tools and it would only take 5 minutes to swap it over.
Things To Buy
- Material for the backboard. This could be thin plywood, masonite or even some kind of perspex. You want it a thin as possible so you don’t loose storage depth for fat utensils & tools. I used masonite because it’s thin, strong, and my friend had a piece lying around.
- Elastic strapping to hold things to the backboard.
- Aluminum rivets
- Washers
Tools Needed
- A saw to cut your backboard to size (handsaw is fine)
- A drill and 3/16” drill bit
- A pop rivet gun
- Scissors
- Lighter or matches

Tools required – rivet gun, rivets, washers, elastic, backboard
Step 1: Backboard
Cut your backboard to the size of the backplate on your Tailgate Table. For the Trailgator it’s 10.75” high X 24” wide. Mark and drill holes in the new backboard that line up with the original mounting screws on the Trailgater – 4 across the top and 2 at the bottom corners.
If you have a different Tailgate Table, re-use whatever screws or bolts are holding it to the vehicle in a similar way.
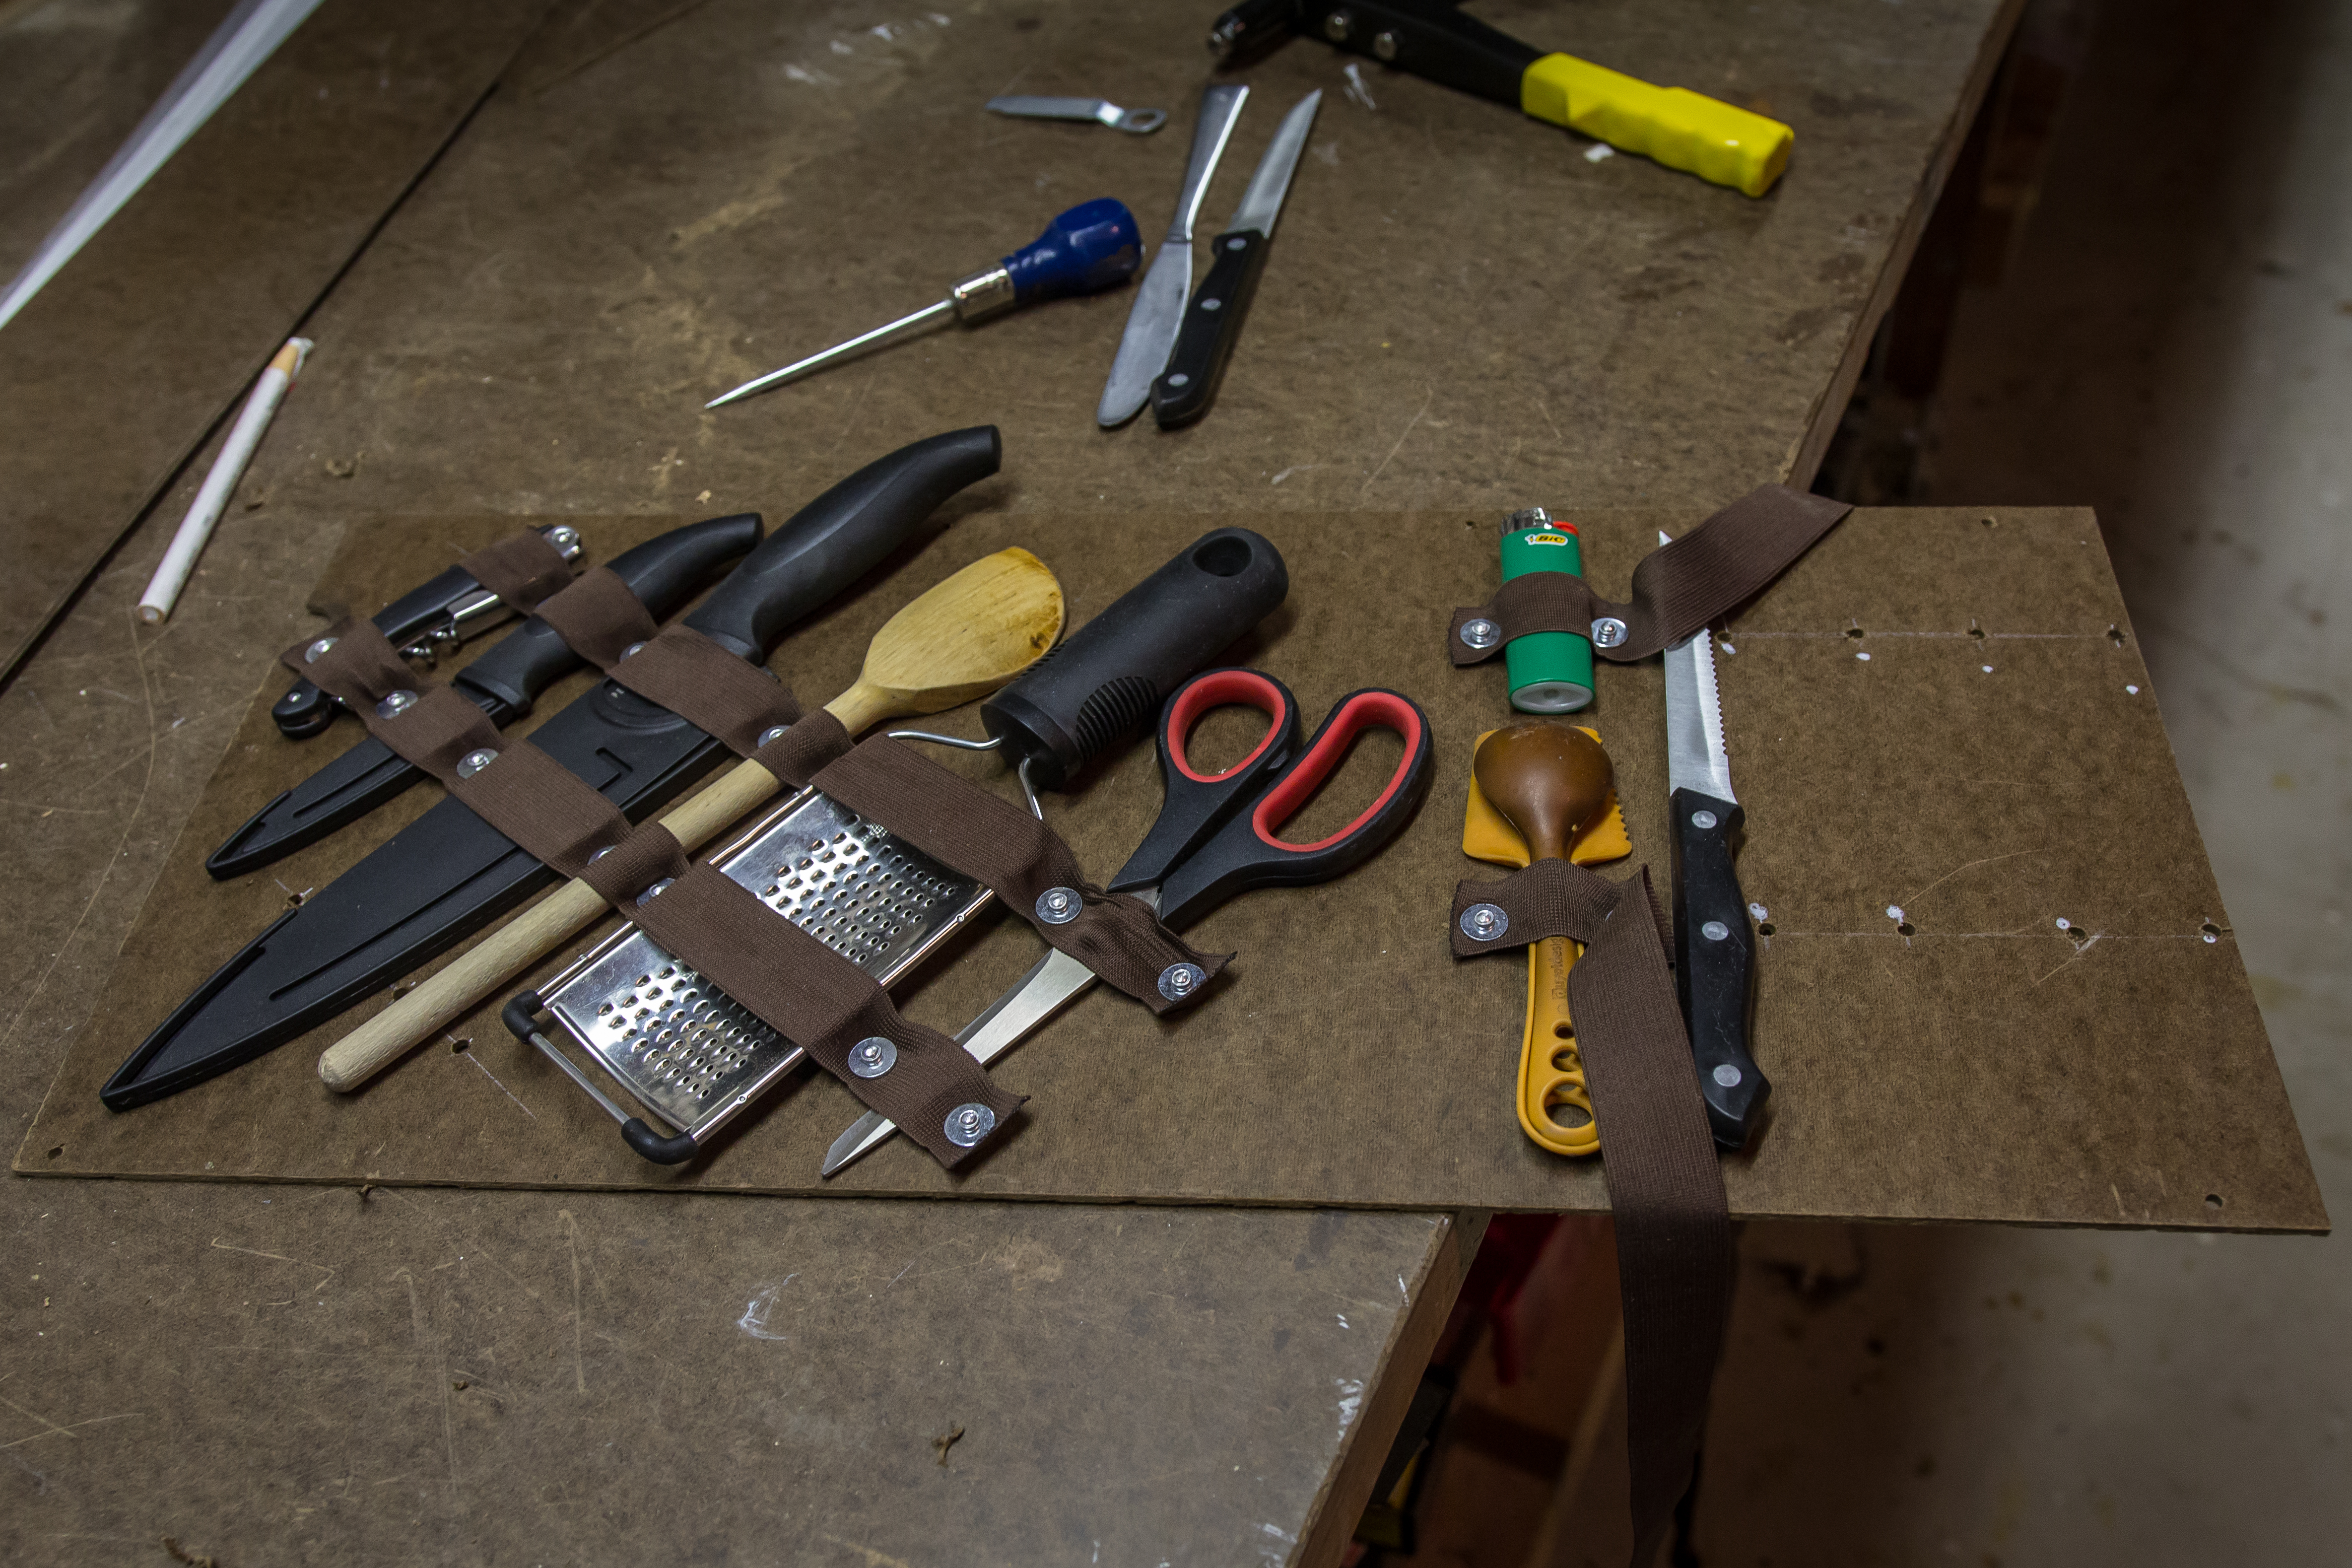
Step 2: Layout
Layout all the cutlery and tools you want to mount on your organizer. On the Tailgater there is exactly 1” of thickness between the backboard and table when it’s folded, so the thickest item you can place on the organizer is 1” minus the thickness of your board. Spend some time putting everything where you want it, thinking about most-often used items and how easy they will be to remove. It’s fine to have things protrude over the top edge an inch or so, but they can not extend past the edges or bottom of the backboard, else they will interfere with the Trailgater itself.
I found putting long items on an angle worked well, and putting items of similar length together helped when two and three straps were required.

Layout takes some time to get just right
Step 3: Holes for mounting
Mark holes on each side of every item. Don’t put the holes super close to the item, because the diameter of the washer means you need a little breathing room. Don’t worry, the elastic will stretch and keep everything very tight.
For the longest items I decided to use three straps, which in hindsight is overkill. Everything else has two.
Take everything off the board and mark all the holes in straight lines, so it looks nice when finished. Drill all the holes with the 3/16” drill bit.
Mark and drill a hole on each side of every item
Step 4: Attach Elastic First Hole
Poke a small hole through the elastic about 1/4” from one end.
Push a rivet through the first hole in the backboard from the back (very important)! then push the elastic over the rivet, and a washer over that. Hold the washer firmly into the elastic and backboard as you use the rivet gun to squish the rivet until the end breaks off.
The rivet will expand on the front side to capture the washer, which holds the elastic securely and has enough surface area so the elastic won’t just tear out.
The rivet goes through from the back to make sure the back of the backboard is as flat as possible, and doesn’t waste storage depth.
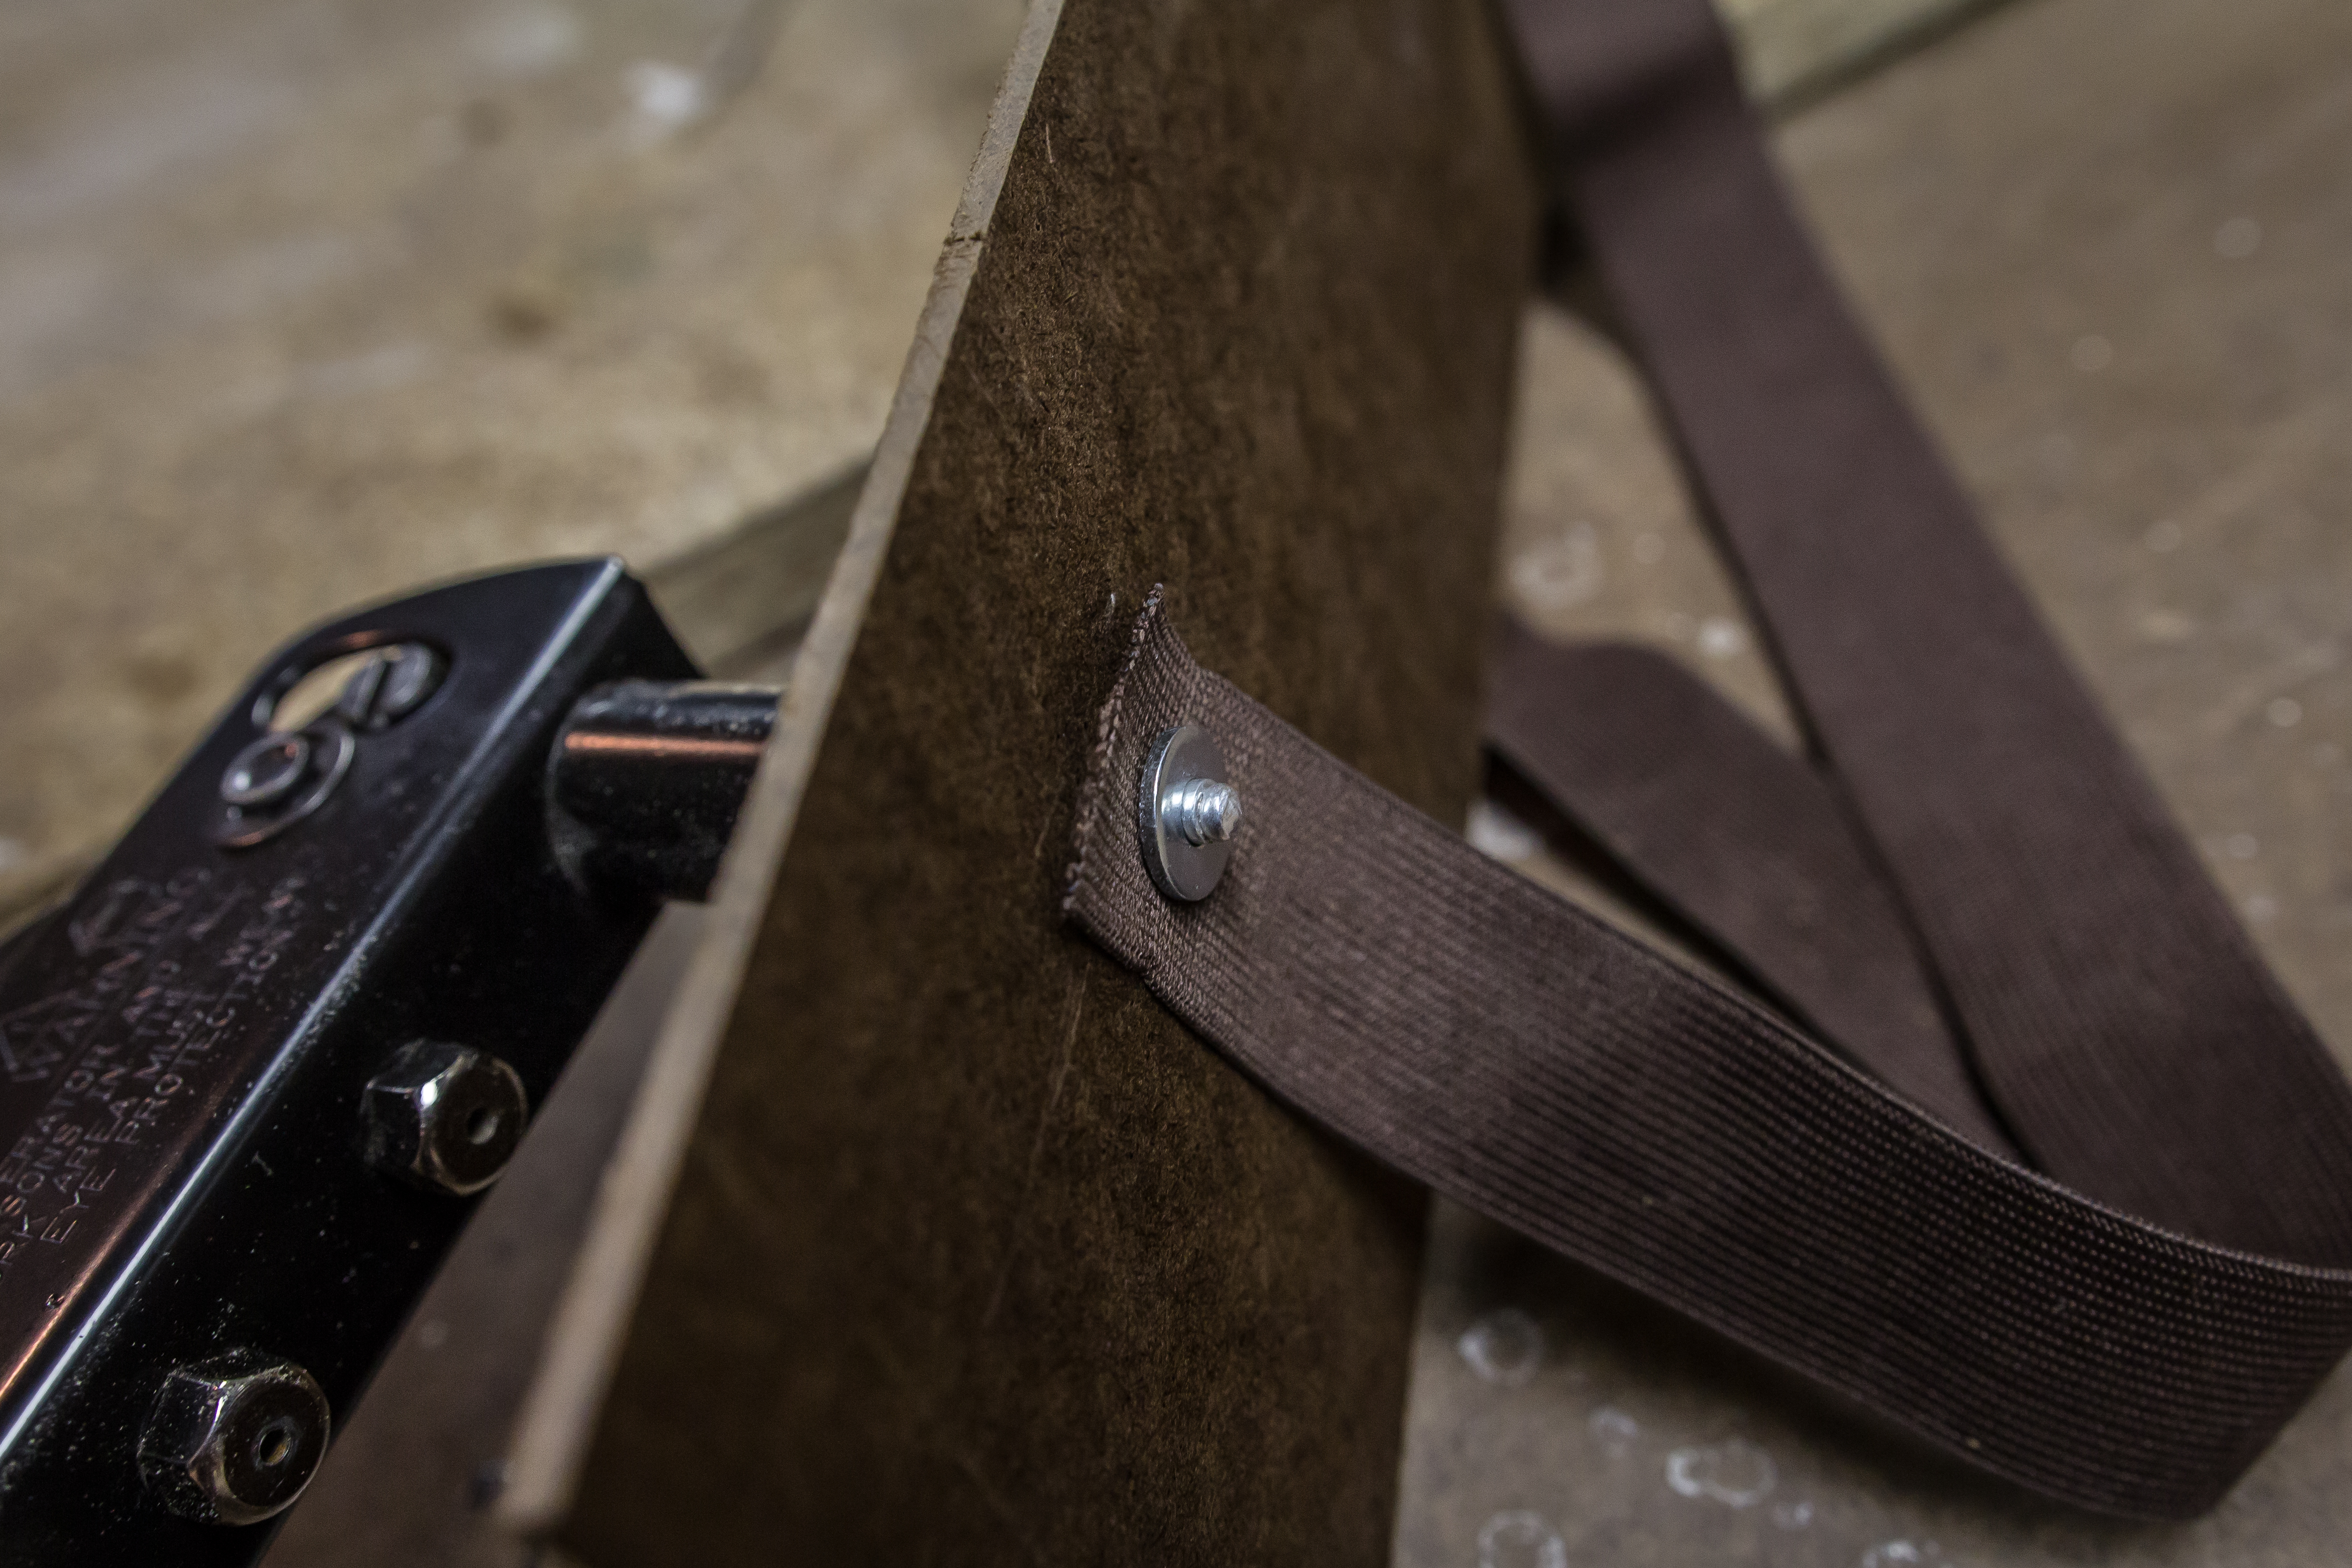
Push the rivet through from the back, then elastic, then a washer
Step 5: Attach Elastic In Second Hole
Lay the item you are attaching onto the backboard, and stretch the elastic over it towards the hole on the other side. Poke another hole in the elastic that corresponds to the hole drilled in the backboard, move the item out of the way, the use the rivet gun as before to attach the elastic in the second hole with a washer.

An item held down with rivers and washers on both sides

Rivets seen from the back – as thin as possible
Step 6: Repeat
Repeat this process all the way along your straight lines of holes, each time using the item you’re attaching as the guide of how much to stretch the elastic.
You can do continuous strips of elastic where convenient, or start and stop a strip whenever it’s helpful, based on the size and shape of the things you are attaching.
Half way through mounting items to the backboard
Step 7: Melt ends of elastic
Wherever you have an end of elastic, melt the end with the cigarette lighter to prevent fraying.

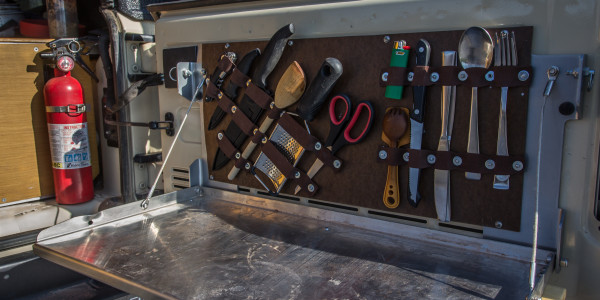
The complete organizer
Step 8: Mount backboard to Tailgate table and Vehicle
Using the original screws that hold the Trailgater to the vehicle, put the screws through the backboard, through the Trailgater and into the vehicle to hold everything in place. It’s easiest to remove all the items from the organizer when doing this.

The completed project, mounted to the Trailgator Tailgate Table
That’s it! Enjoy your new organized cutlery and tools.
-Dan Grec
http://theroadchoseme.com