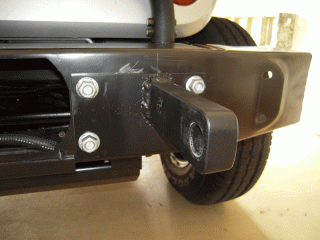
In retrospect, I would have welded gussets to each side of the tongues to give them greater lateral strength. Next time I’ll take the process that one step further.
After priming and painting, it’s time to test bolt the two assemblies to their respective positions on the bumper under-frame. To facilitate this fastening, I reversed the bolts so that the nuts are in the front. Replacing them from the rear of the frame is a “mother”. So, to make life a little easier, I reversed them…besides they don’t interfere with any of the reassembly.
Set up the laser level once again, and align the beam with the direct center of the towing tongue. Next, remove the towing assemblies from both sides of the bumper frame. (Sorry about that,) and replace the plastic bumper assembly in preparation of cutting the openings on the plastic bumper so that the tongues can pass through. After replacing the plastic bumper take note of where the laser spot falls. Tape the cardboard template onto the outside of the bumper, center the dot and scribe the rectangular hole where it falls on the front of the plastic.
Now remove the bumper again and, with a heated utility knife, cut away the unnecessary plastic. Be careful….don’t ruin the project appearance on the final stroke of the pen.
Repeat all of the above on the left side and cut your hole. Reinstall your new towing bars and slide your bumper back on for the final time!!! Bolt it on and add you’re “D-Rings”. You now have a neat, finished product that will draw the attention of all “knowing” Jeep enthusiasts asking, ”How the hell did you fasten pulling shackles to that stock bumper?”
Related – Driving Skills: Left Foot Braking
* Published by JPFreek Adventure Magazine – The leader in Jeep and adventure enthusiast publications.
