With my parts painted it was time to get started with the conversion. The instructions tell you what tools you will need. I did a quick check of my toolbox for everything and once I confirmed I had everything, the clock started.
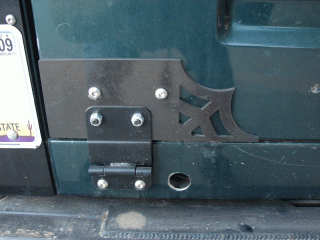
The instructions show that there are two holes under the body of the Jeep that can be accessed easily if you already have a body lift or if you want to remove the body mount bolts in the rear. I like to take short cuts when viable so I used a hole saw to put 1″ holes on either side of the rear panel which took me all of a minute. It works pretty well and the “nut bar” that is included with the kit has a sturdy wire welded to it for easy placement for the lower hinge bolts. So far I had about 30 minutes invested and my first hinge and “spider plate” were already attached to the tailgate. The left side of the conversion was basically done.
My next step was to remove the factory hinges and replace them with the provided steel plates. This sounds easy enough and the new steel plates screw into the existing holes using the stainless steel bolts provided in the kit will fit in well with my black corner protectors. This, however, was not so easy. My first try at getting one of the hinge bolts out met with complete failure as my “Made in China” torx bit snapped off in the bolt.
So off to the store to purchase some new bits and when I had come back to repeat the above process, Bang! It broke off! I got to thinking and my Sahara hinges came painted the same color as the body from the factory. Perhaps I should have burned the paint away and heated the bolts up with a torch first but now my main problem was getting the two out that have hardened bits stuck in them.
Well, three drill bits later and I managed to remove the two bolts that had had the broken torx bits in them and I managed to get all the other bolts removed from the factory hinges. Hooray!
I took the plates supplied with the kit and started placing them in the proper position to replace the factory hinges and make the conversion work. With the four plates on the right side of the Jeep installed, it was time to install the last hinge and the hardware for the latch to secure the right side from rattling.
With my hole already drilled for easy placement of the “nut plate” on the right side, I installed the right side hinge. Moving to the top of the tailgate, I installed the hardware for the latch and now with about an hour of time invested, I was almost done. Things were looking very good at this point and I was very happy with the product and the progress so far.
